NiN Summer Camp: Wilderness Skills Week
Overview:
- Landscape (upper hill, lower hill, vineyard, cattail "pond")
- Hazards (sun!)
- Facilities/supplies (no amazon)/wind/staff pool!/housing/construction?
- Staff/routines
- Kids
Flow: Nature/survival+ personal creative
Pre-camp (Sunday?): family meet n greet @ vineyard
- trickle in/meet and greet (art, friendship bracelet etc.)
- morning circle (gratitude, introductions, song, announcements, etc.)
- group game (older/youngers)
- rotation (1-2)
- morning snack
- rotation 3
- lunch
- water cool off (slip n slide
- crafternoon or other creative
- clean up!
- closing circle (favorite thing of day, circle game etc.)
- outro/parent
Post camp: gelato/town/dairy/ wine tasting wednesday?
Skills List:
- Char cloth, magnifying glasses (ferro rods and flint?)
- match training
- Clay pottery
- Knife safety (age 7 and older)/try sticks
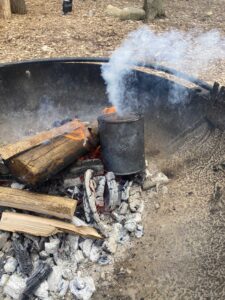
- Cooking over/on fire
- tarps and knots
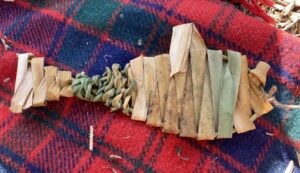
- Tinder bundles
- Cattail Cordage/necklaces (elderberry beads)
Younger students: age 3?-6/7?
- river cane knives (cut the cheese, knife safety A, B, C only)
- making a fire together
- cooking over fire
- making woven "fish"/cordage/necklace
- clay/charcoal camouflage
- grape charcoal rock/paint/art
- elderberry gummies
- tinder bundle
Games: stalking game, capture flag, wolf pack, lizard tail
Other considerations:
Hazard awareness (heat, other)
Staff organization
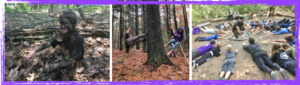
Knife Safety Training
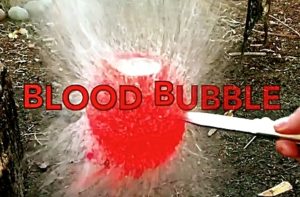
Knife use is essential to survival skills. Before we hand out knives, we first review the "knife ABC's) with students. Check out the video below. With students go over each of these, and then as a group, see if they can remember all the safety rules, from A to E. Once students can recite these (as a group first), then hand out knives. Tip: don't give them a knife until they have first found a blood bubble spot sitting down. Then go by each student and hand out a knife, only after they have asked to borrow a knife (Rule A).
Safety: This is one of the more hazardous skills we teach. We recommend ages 7 and older. Have a second assistant instructor help to walk around and observe safe techniques, and if needed, give suggestions. Have a first aid kit on hand. Sharpening the knives before your class will help make carving easier. As you offer tips, and float around to observe carving, continually ask/remind the students about the ABC's. With each subsequent class, start by reviewing the ABC's.
Making Char Cloth
 Making Char Cloth
Making and using char cloth is a great way to introduce a survival skill technique for making fire with youth. Download the lesson plan below to learn this easy and engaging skill.
Making Cat-fish
 Making Cat-fish
Learning to weave using natural materials is an essential survival skill. In this lesson below, we teach you how to weave a cattail "fish".
Making Cordage
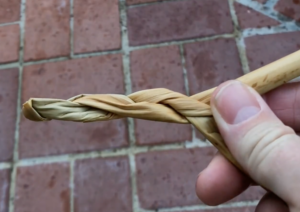 Making Cordage
Rope is used in practically every survival skill project. In this lesson we teach you how to weave natural rope, a.k.a. cordage. You can make cordage using cattail and use it to tie your cattail fish together and to make a "fishing line" that is tied to a fishing pole (a stick or the center stalk of cattail). Watch the video below to learn how to make cordage.
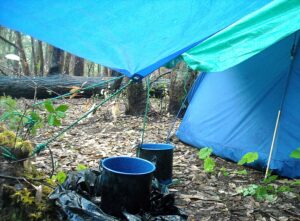
Pitching a Tarp
 Pitching a tarp
A great way to introduce the skill of shelter is by teaching how to pitch a tarp. This is also a great way to introduce basic knot tying skills. In this lesson, students will learn two basic knots for pitching a tarp and a group challenge for pitching a tarp.
Materials
- A small tarp. If you have a large group you can use multiple tarps and subdivide your larger group into smaller groups with each group given a tarp to pitch.
- rope. We recommend 50 to 100' length of parachute cordage per tarp, depending on the landscape you choose to pitch a tarp. It's always a good idea to have an extra bundle on hand in case kids need more.
- A 3' length of parachute cord rope per student
- A 6' length of larger diameter colorful rope
Location
Choose a location where students will have vertical or horizontal objects where they can tie their tarp ropes. If you don't have access to a forest with trees, you can use existing fences, playground structures, or other nearby objects. This is a great opportunity to give students a challenge for finding a place to pitch their tarp. In a survival situation you are going to have to be creative. See what creative solutions they can find for picking a location for tying their tarp. If you are limited by objects to tie their tarp, students can choose to have one side of their tarp anchored to the ground with rocks or stakes, and the other side raised and open (tied off with ropes to higher objects) as an entrance.
Preparation
Watch the video below to learn two basic knots for pitching a tarp.
Knots
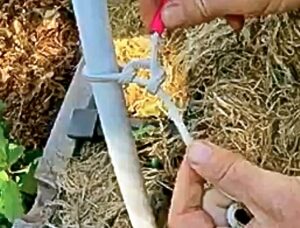 Teaching knots
In this lesson you will teach two knots, the half hitch and the taut line hitch.
Materials
- a 3' length of rope per student (parachute cord preferred, but any rope will work)
- One larger diameter (1/4" or bigger diameter) colorful 6' length of rope
Preparation: set up 6 knot demonstration stations. At demonstration station #1 and #2, tie 1 half hitch knot to a support (tree, fence, vertical pole etc) at each station. At stations #3 and #4, tie a two half hitch knot at each station. At stations #5 and #6, tie a taut line hitch knot at each station. Small groups will visit these stations to study the knots.
Linecraft group knot challenge.
The challenge for each group is to study the demonstration knots that you have tied, and then go find a place to attach their rope using two half hitches. Don't teach them how to tie them (yet). That will come later. The goal is to see if they can figure out the knot by looking at it. If you have larger diameter rope for the demonstration stations, this can help, but parachute cord will also work.
Challenge #1, a single half hitch knot
- Have students form groups of two or three. Each student is given a 3' length of rope.
- Each group has the challenge to visit demonstration station #1 or #2 to carefully study your demonstration knot. Don't give them any instructions (yet). The goal is for them to study the knot to see if they can figure it out. They can touch the knot, but cannot untie it.
- Each group picks an object somewhere nearby on the landscape (ex. a tree or play structure) where they will attempt to replication the knot. They can work with their team to help each member tie their own knot. Optional challenge: you can give the team the challenge to see how fast their team collectively can get all of their knots tied and return to your "home base".
- Regroup after everyone tied their knots. Ask- "Who thinks they know how to tie this knot? This knot is called a half hitch." Have two volunteers come up in front of the group. One volunteer holds their arm out. Using the large diameter, colorful 6' length of rope, have the second volunteer demonstrate tying the single half hitch knot over the arm of the first volunteer while describing the technique. Make sure they don't synch the knot too tightly on their partner's arm.
- As a large group, visit each team's station to see how they did tying the first knot. Correct/retie knots as needed when visiting each station.
- Repeat the entire process, this time with two half hitches. Each group visits the demonstration station for this new knot (demonstration stations #3 or #4), then they attempt to tie the two half hitch knot.
- Repeat the entire process with the taut line hitch.
The tarp-pitching challenge
Preparation: set up a demonstration tarp using ropes and the two knots: 1) two half hitches, and 2) the taut line hitch. Attach the rope to the grommets of the tarp on each corner using two half hitches. Attach the ropes to nearby trees or vertical supports using a taut line hitch.
Now that each group knows a few knots to tie, the next challenge is to apply these knots to putting up a tarp.
- Show students your demonstration tarp.Point out the two half hitches and show how the taut line hitch is adjustable
- Form groups of 4-8 students per group
- Give each group a tarp and 4 lengths of rope (10-20' lengths each)
- The challenge for each group is to see if they can pitch the tarp using the knots they learned. Option: time them to see how fast they can pitch their tarp as a group or give them a count down by saying, "You have 15 minutes to put your tarp up. A big storm is coming. Ready...Go!"
- Regroup when all tarps are up. Visit each groups tarp, giving compliments and critiques.
Option: The "storm" challenge
Tell the students that a big storm is coming and they need to set up their tarp so that the entire group can get under it to remain dry. Tell them a big storm is coming to "dump" a lot of rain on their tarp. When all group tarps are ready, regroup and get a large bucket of water. Visit each group's shelter. Have each team get under their tarp, then throw the entire contents of the bucket of water onto the tarp to see how dry the students remain.
Advanced option: The water catchment challenge
Rainwater can save your life as a source of potable (drinking) water. Give each student a small bucket or empty container (such as a pot). Their challenge in setting up their tarp is to design it such that when you dump water onto the top of the tarp, it will run off and fill their empty pot/bucket. When you do the visitation round to each shelter with all students, dump/throw your instructor bucket of water onto the tarp and then 1) see how dry the students remained, and 2) see how much water they collected in their catchment design.
Young student option
Demonstrate how to tie a two half hitch knot. Give each of the students rope and help them tie this knot. Then let them play with the rope and see if they can come up with their own new knot. Let them name this new knot. Then with one tarp, go put a tarp up together with their help. Do a simpler water test. You (the instructor) can get under their tarp and have the students be the "storm". Give them cups and let them dunk them in your water bucket and then throw the water up onto the tarp to see if you "survive" and stay dry. After you do this, see if any of the students want to get under the tarp and let you throw water on the top.
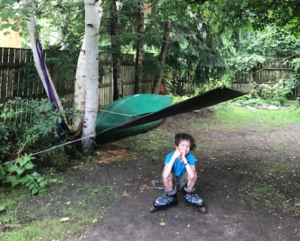
Option: Leaving the tarps up
Once tarps are up, you can leave them for shade shelters for restful time, or as team home bases for playing games (capture the flag, water squirting games, etc.)
Natural Pottery
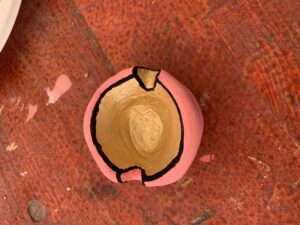 Natural Pottery
Clay can be found in many soils in nature. In this lesson we will teach how to process clay and two methods for making a bowl. Download the pdf below.